


A Bubbly Life is on Instagram, Facebook, Twitter and Pinterest, would LOVE for you to join me there!
On Leap Day, I announced A Bubbly Life’s Pinterest Project- One Pin At A Time
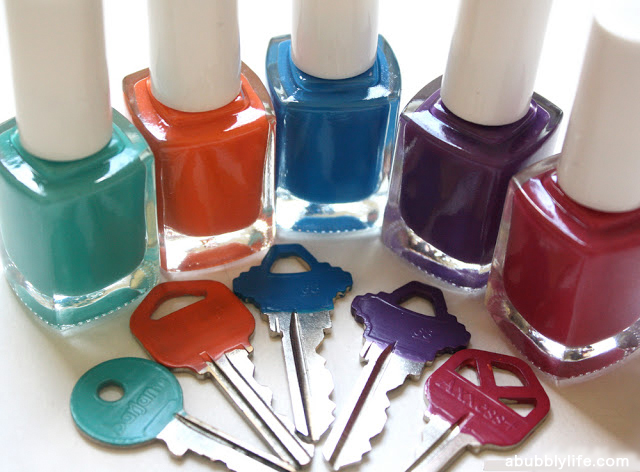
My Pinspiration was a post from the lovely blog Happiness is…To Each Their Own. who did a glitter key- But I did not have glitter or glue and did not want to buy any, so I decided to use my new Spring colors set of nail polish I had!

I did two coats on each side. The only task that took up time was waiting for one side to dry before painting the other side.
I had to include one of the outtakes- my little helper kept grabbing my props & knocking them over, thank you for your patience cutie!
 |
| Kalia wanted to play & eat the keys (which, she of course, was not allowed to do) |
I look forward to working on more Pinterest Projects, join A Bubbly Life on Pinterest for more inspiration! And if you like this DIY, please pin it, I love getting pins!
More easy DIYS!
Glam Mousepad in 5 Minutes
Paper Bag Flower Vase
No Sew Ruffle Tablecloth


Great idea if you can remember which key belongs to which color^_^
Haha! This is true
Paint a little spot on the lock??
OCD but … in my index card box of miscellaneous info I included a "key legend" – there's a strip of the color, and beside it the lock it belongs to. On the opposite side, an inventory of how many of the key exists and who has them.
I love this so much, I made my own within 5 minutes of reading your post. Thank you! Where did you get the pack of nail polish?
Thank you Keri! I got the nail polish pack at TJ Maxx, I love that store, and I think it was only $5!
I love this! But before I do it, do the colors actually stay on the keys or does it chip off right away? Thanks!
Thank you Erin! Mine have been on with no chipping for about a month now. I do not really know how long it might stay on, but I plan on changing out the colors here and there. Maybe I will update in the future how long it has been going!
I've done this to my keys, it didn't last for more than a few weeks before it all chipped off. Maybe the brand of nail polish affects how long it will stay on.
I used two brands of nail polish on mine and one is very slightly scratching around the ring, but the other is still holding strong. I don't care about the scratches because it's an easy fix, plus I'm just so happy to be able to tell my work keys from my personal keys.
Keri, that makes sense, I think it depends on the brand you use, Melissa. I have been following up on Pinterest and so many commenters said I have been doing this for years and love it… And a couple said their's came off right away.
If you really wanted to get serious, you could get spray adhesive that would keep it on forever!
Maybe you could use sand paper on the keys to dull the shine on them before you used the polish or paint. Also I would use polish remover or something similar to clean any oils, dust (from sanding) or any residue that might be on them first.
Great ideas Becky! Thank you!!
You might could also apply a clear coat of nail polish to make it last longer.
Yes popping a sealant over it would more than likely last longer…what a fab idea though..thankyou
Hi, I'm visiting from the Serenity Now link party. I loooove this idea, I'm forever fitting which key goes in which door in our house this seem like it would be the perfect solution. 🙂 Thanks for sharing! Oh & the baby pic hand is my favorite! So sweet!!! 🙂
Hi Nadir! Thank you for coming by! I must admit, the baby hand pic is my favorite too- love her!!!
This is such a great idea!! Sometimes simple solutions are always the best. Love the fun colors you used, too.
Thank you Shannon!
Thank you! I'm going to do my keys for work – hope the principal doesn't mind 🙂
LOL, I cannot be held responsible! 🙂 Thank you for commenting!
I have seen that pin with the glitter and have liked it. I think yours came out great! I pinned them for you, but I'm also going to feature them tomorrow on my Monday Organizing & DIY link party. Thanks for linking up.
Thank you Sandy, and thank you for the linky party!
These are so beautiful. The colors look great together and I love your baby's hand in the picture… adorable. I featured this at Lines Across.
Rachel
http://linesacrossmyface.blogspot.com/2012/04/nail-polish-keys.html
Hi Rachel! Great blog, thank you so much for sharing it on your page!
That is such a great idea!!!!!!!!!
Thank you Susie!
this is a great idea. i would so do this except that i work for a university & think i would get in trouble if i messed w/ their keys. 🙂 so i'll continue to stand at the doors and fiddle with 5 different keys til i find which one fits. 🙂 at least they're on a separate ring from my car keys!
Hi Sarah!
Maybe you can just do a dot and feign innocence if anyone notices 🙂
You could try sanding the keys a bit first to remove any grease etc from the surface then the polish would probably stay on longer…use a top coat too if you really want durability. Lovely idea…I have so many colours to choose from,where to begin!
Not a bad idea! Thank you!
I love these!!!!
I so need to try this!!!!:)
It will be one more thing to add to my already colorful collection! Thx for the idea!!!!!
Thank you so much :))
Pinned! Great project =)
Thank you for pinning AND leaving a comment- you are awesome!
Fantastic idea. I'm always mixing up my keys so some simple, and pretty, colour-coding will do the trick!
Thank you! Works great for me!
What's the nail polish brand?
Hi!
I do not know the brand, sorry, it was some special Spring color set I picked up at TJ Maxx.
Thank you!
I used this trick to color code my school keys. I work at two schools so I used my school colors to code my keys! Saves time when trying to grab the right one.
Thank you for commenting! Saves time and such an easy fix!
How is possible that I never before imagine that beauty idea 😀 amazing the glitter key and the color ones
I love the glitter key… I think I will do that next!
So clever – thanks for the idea!
I began this project with some red glittery polish tonight, but it is coming off more dimensionally than the keys in this pic. I don't know how long it will last, or if I will (as I do with my fingernails) just end up peeling it off. :)~
(posted this on Pinterest here too – http://pinterest.com/pin/264023596875144139/.
What brand of polish did you use that worked so well?
What a great idea ! This is nice, yours colours are wonderful. I used to put different stickers on my keys, but that is nicer. Thanks.
Nice idea… I just post about it in my blog (with your credits, of course!)
http://fraldasebaldrocas.blogspot.pt/2012/08/diy-color-your-keys.html
Hello! I found your DIY post on the Craftgawker site. It's really great! Just want you to know I used your method and it worked! You can read and see it on my blog, hope you like and don't mind it! 🙂
http://potatoe-potato.blogspot.nl/2012/08/diy-painting-your-keys-kleur-je-sleutels.html
Cute idea! I found this on Pinterest and created my own with a link back to you!! http://dreamingofjune.com/5-second-painted-key/#
Nice idea for make a better key…
Good idea…
Thank you so much! I painted both side of the keys and taped the other end to the edge of the table to make the project a little faster
damn it i just made 2 new colored key for 10$ each ..
i should have used my wife nail polish to color mine ..
thank u .. <3
I’m glad to locate so much of informative data in your blog.
bubblegum casting
Your blog is great! Inspired me to make my own color-coded keys! I credited your blog on my post. Check it out here: http://samthingtodo.wordpress.com/2014/04/16/color-coded-keys/
This is an informative blog by which I have got that info which I really wanted to get. bubblegum casting reviews
I'm curious, it's 2 years later, how is this working for you? 🙂
This is great idea for colors actually stay on the keys. More information click on this Car Keys.
http://linesacrossmyface.blogspot.com/2012/04/nail-polish-keys.html … gluehweinset.blogspot.de
[…] (adsbygoogle = window.adsbygoogle || []).push({}); If you are that busy person with a lot of keys, this one is surely for you. You can easily keep track of which key is for which door or lock by painting them in a different color with nail polish. Tutorial HERE […]
[…] If you are that busy person with a lot of keys, this one is surely for you. You can easily keep track of which key is for which door or lock by painting them in a different color with nail polish. Tutorial HERE […]
[…] Five Minute Diy Color Code Your Keys […]
[…] Tutorial […]
[…] Five Minute Diy Color Code Your Keys […]
[…] 7.Color code your Keys […]
[…] abubblylife.com […]
[…] A Bubbly Life ADVERTISEMENT: (adsbygoogle = window.adsbygoogle || []).push({}); […]